
Part 3 of 3 — M E M O_C A R D
Alright, I decided to post this a day later than promised; I apologize. When I started this blog, I hadn’t planned the execution of the projects. I assumed it would be easy to write the first two posts before tackling the challenge for the third and final part of each project. I’ve now devised a new system behind the scenes to generate content more consistently. So, let’s wrap this challenge up.
In Part 2, I shared plans for this challenge. The idea was to recreate the concept in a digital format. The user would upload a .png image, input .json metadata, save the metadata to the image, and enable the user to retrieve it by reuploading the image.
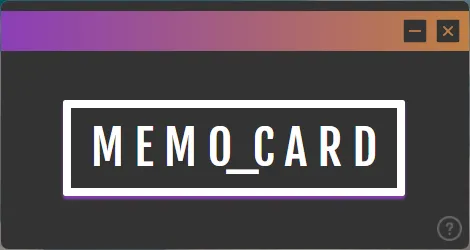
After tussling with GitHub Copilot, editing the backend code the AI contributed, building the UI from scratch, and extensive testing, I succeeded. Here’s a screenshot of the application.
Regarding the application’s aesthetics, I aimed for compactness with a minimalistic style. The faux magnetic stripe on top replaces the traditional software frame, letting you drag, close, and minimize the application. The choice of the purple-to-orange gradient was merely a design choice that I found appealing. The M E M O_C A R D logo not only shows the active application but also serves as the button to upload .png images.
At the bottom right, there’s a help button describing the application and linking to this Medium account and my GitHub profile. The user interface is minimalistic and sleek, which I successfully achieved. Now, let’s get into the details.
“`javascript
const { app, BrowserWindow, ipcMain } = require(‘electron’);
const path = require(‘path’);
const fs = require(‘fs’);
const extractChunks = require(‘png-chunks-extract’);
const encodeChunks = require(‘png-chunks-encode’);
const PNGTextChunk = require(‘png-chunk-text’);
“`
I mainly used Electron, vanilla CSS, and HTML. However, I did use dependencies like PNG Chunks Extract, PNG Chunks Encode, and PNG Chunk Text, as shown in the code above. I also used Path and FS, native to NodeJS. The bulk of my work was on the frontend, where I excel. For the backend, I collaborated with GitHub’s Copilot AI for necessary changes and suggestions. Let me tell you, working with AI made this challenge both easier and harder, often breaking my code without improvements.
Regarding the application’s directory organization, I maintained standard cleanliness. Here’s the structure:
“`plaintext
📁 memo_card
├── 📂 assets
│ ├── 📂 cards
│ │ ├── 📄 blank1.png
│ │ └── 📄 blank2.png
│ ├── 📄 back.png
│ ├── 📄 close.png
│ ├── 📄 github.png
│ ├── 📄 help.png
│ ├── 📄 medium.png
│ └── 📄 minimize.png
├── 📂 documentation
│ ├── 📂 Recordings
│ └── 📂 Screenshots
├── 📂 node_modules
├── 📂 pages
│ ├── 📄 form.html
│ └── 📄 help.html
├── 📂 scripts
│ ├── 📄 back.js
│ ├── 📄 form.js
│ ├── 📄 help.js
│ ├── 📄 minimize-close.js
│ ├── 📄 stripe.js
│ └── 📄 upload-popup.css
├── 📂 styles
│ ├── 📄 form.css
│ ├── 📄 help.css
│ ├── 📄 main.css
│ ├── 📄 misc-font.css
│ └── 📄 upload.css
├── 📄 index.html
├── 📄 main.js
├── 📄 package.json
├── 📄 package-lock.json
└── 📄 preload.js
“`
In the cards subdirectory, there are .png files titled “blank1” and “blank2.” I asked ChatGPT to generate some blank cards in case users didn’t have an image in mind but wanted to use the application.
For the technically inclined, you might wonder about the Big O notation for this process. Here’s the time/space complexity:
“`plaintext
────────────────────────────────────────────────────
│Component │Time Complexity│Space Complexity│
────────────────────────────────────────────────────
│PNG Read/Write │ ( O(n) ) │ ( O(n) ) │
────────────────────────────────────────────────────
│UI Event Handling│ ( O(1) ) │ ( O(1) ) │
────────────────────────────────────────────────────